Whether you have just moved into a newly built house, or if you are restoring an ancient villa, you will probably be faced with cracks in the plastered walls at some time. It is a normal occurrence and you should not be too alarmed, explains an experienced building company in London, VDL Construction. Providing the cracks are not too deep, you will be able to repair them with a minimum of building expertise.
Why do cracks form in plaster?
If you live in a tremor or earthquake belt, then cracks can be caused by that movement or it can simply be weathering, changes in temperature and the passing of time that causes the underlying supports to disintegrate and the plaster to become loose.
Also consider the position of the property in relation to traffic, railways or massive construction projects nearby.
The quality of the plaster is also a factor, and if there was cost-cutting in this area of the building, then you will find cracks appearing.
Of course, just normal day-to-day living can take its toll on the plastered walls. For example moving furniture, hanging artworks, horseplay by children and animals will cause cracks and bumps in the plaster.
If they are superficial, then it will not be difficult to make the walls look as good as new with a little DIY.
If it ain’t broke, why should I fix it?
Some cracks actually add charm and character to an old building, so is it really necessary to repair them, you might ask? If you leave them, cracks will definitely not go away.
In fact, they are more likely to get worse and this may lead to greater plaster destruction and much higher costs for you. We have all heard the old saying about “papering over cracks” and there is a reason why we shouldn’t do it.
For this simple DIY project you will need:
- Tools:
Protective sheet, scraper, wire brush, paintbrush, plasterer’s hawk, plastering trowel, spray gun, bucket, sandpaper, sanding block
- Materials:
Quick setting patching plaster, ready-mixed filler, PVA glue
- Safety equipment:
Dust mask, protective gloves, safety goggles
There are many suppliers and DIY stores where these basic materials can be bought. Take a look at the range available here.
Method:
It is important to remember that plaster walls are constructed in two layers. The inner layer is made from wooden or metal lath.
Lath is usually one inch wide lengths of wood that are nailed onto the rough walls. Three layers of wet plaster are then applied and flattened into the lath. Once the plaster has dried, it is ready to be primed and painted.
Step by Step:
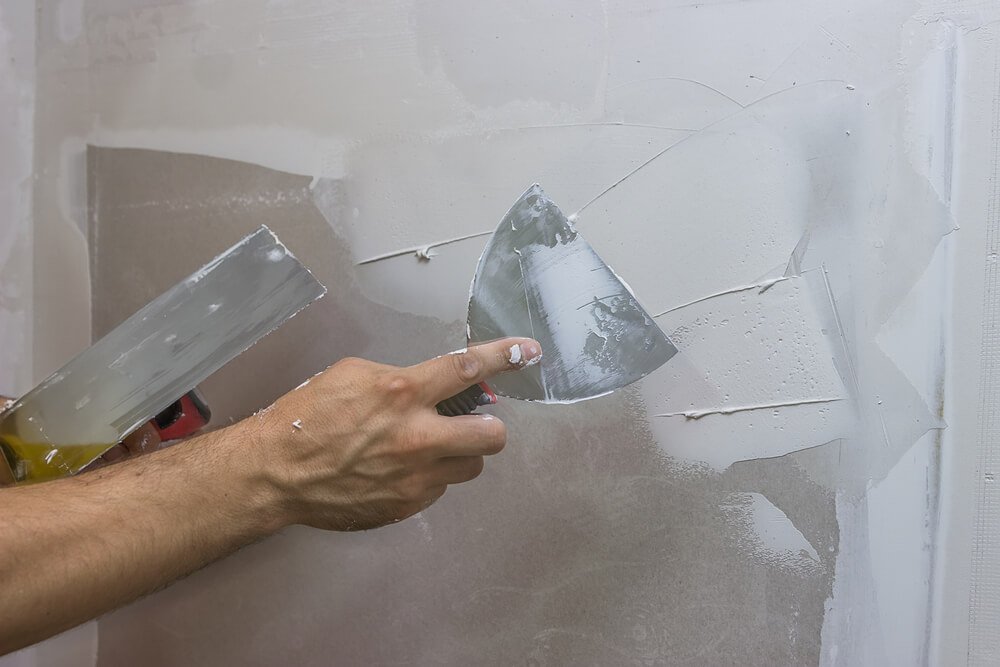
- Clean out the crack using a scraper. It may seem like you are making the crack worse, but all the loose plaster needs to be removed. Use a wire brush or vacuum cleaner to make sure that the whole area is clean and dust-free.
- Make up a mixture of PVA glue and water. Then, using a paintbrush, wet the crack and surrounding area with the mixture.
- Mix the quick-drying patch plaster in a bucket. Remember to read the instructions on the pack.
- Place a portion of the plaster onto a plasterer’s hawk.
- Using a plastering trowel, apply small amounts of the plaster to the damaged area in horizontal and vertical swipes, adding wet plaster as needed. Use extra force to push the plaster into the cracked area.
Important note:
If there isn’t substantial backing behind the crack, you will need to reinforce that area before applying the plaster.
Make the opening surrounding the crack wide enough to be able to push a small piece of wire mesh into the gap. Secure the wire mesh onto a lath with wire ties. This will provide the necessary grip for the plaster to adhere to.
- Leave the plaster to dry and then dampen once again with a paintbrush.
- Create a smooth finish by using the edge of a clean trowel.
Additional sources of information:
I would recommend reading “Dave’s DIY tips” on Plastering for Beginners at davesdiytips.com as he has easy instructions and pictures of the tools and materials that are needed.
There is also an easy-to-follow video on YouTube called “How to repair a crack in plaster” which is short but informative.
In Conclusion:
There are often disputes between building contractors and owners of new buildings about who is responsible for the cracks that have started appearing in their beautiful new abode.
Before you attempt a DIY repair job on the cracks, it might be advisable to get the builder to do an inspection of the cracking. He will be able to determine whether it is being caused by inferior building work, or whether it is just the settling process of the property.
Be aware that it can be quite difficult to work out who has to repair the cracks, but something definitely needs to be done before the problem gets any worse.